Just a few notes from getting GitLabHQ up and running on Debian.
Used the following as a reference, however that is geared toward Ubuntu (and most of it applies) https://github.com/gitlabhq/gitlabhq_install Depending upon your situation you may want to skip some of those steps such as installing ruby (I’m using RVM) and using apache…
If you have not done so already, su to root and add apt-get install sudo.
The documentation on that link is assuming you using ubuntu which uses the admin group for sudo access, and by default on debian it the sudo group. You can either edit the /etc/sudoers and add the admin group or just change the first step to the following:
sudo useradd -s /bin/bash -m -G sudo gitlabhq
sudo passwd gitlabhq
Follow the rest of the instructions (ignoring ruby if you have RVM installed)…
There is one little typo where the guide tells you to edit the gitlab.yml file under “Configure GitLabHQ” The correct path is:
~gitlabhq/config/gitlab.yml
In my case I wanted to use MySQL instead of SQLite, so I went ahead and edited the database.yml file to mysql… Added the mysql2 gem to the Gemfile then ran the following commands:
bundle install –without development test
bundle exec rake db:setup RAILS_ENV=production
bundle exec rake db:seed_fu RAILS_ENV=production
On my Dev server I’m running apache with passenger, so I added a new site pointing to the public directory of the gitlabhq user that was created during the process and fired up the url. Everything seems to be working fine, I’ll update this page as I get to play around a bit. So far it seems solid, comitted my first project and update.
My main reason for installing this was to avoid the costs of using one of the git hosting sites. I couldn’t see paying for it when I’d like to create a whole bunch of repositories for testing and side projects, cost wise it just didn’t make sense.
Using this post to keep some notes on a few things I did to my XenServer instance, most of this is just common sense.
Disable root login via SSH
First things first, make sure you add a user on the Xenserver box. This is the user you will allow to login via SSH (if you have SSH running at all).
Edit the sshd_config, and find the text #PermitRootLogin yes and change it to:
PermitRootLogin no
Right below that add a new line, and replace USERNAME with the username you created.
AllowUsers USERNAME
If you have more then one user that you want to add just put a space between them and add them in succession. Example:
AllowUsers john harry bob
Then go ahead and restart sshd:
/etc/init.d/sshd restart
Open up a new terminal session and make sure you can login to the server under your new user, and you should be good to go!
Edit the web page that XenServer shows or limit access completely
Xenserver by default serves up a web page that gives your links to download the Xen Center admin console… The web server also servers up the XAPI that is needed for the admin console to access the server remotely. So you have a few options, edit the index.html page to remove the data on there and serve up a blank page. Or the better option is to restrict access completely to the XAPI via the hosts file. And the best option is to toss the Xenserver behind a firewall (hardware or software). Perhaps I’ll go into detail on how to do that in a future post, but in short, firewall the entire server and tunnel in via SSH, which would be the most secure avenue. The only downside to restricting access via a firewall or restricting access via the hosts file is that if you are not at home / work / at a PC where you have access to the restrictions in place your, out of luck on getting access to your server. Now keep in mind, there are alternatives for access (port knocking, ssh via another server or VM, etc) I could go on forever, but everyones situation is different. With that said, lets go over the first two options.
To prevent XenServer from showing the default index.html page, you can either edit the actual file and change it to your liking. The file is located here:
/opt/xensource/www/index.html
For the second option, you can reference the Citrix support document here for detailed information on modifying the hosts file http://support.citrix.com/article/CTX118504, however below is essentially what you need to do.
First edit the hosts.deny file located here: /etc/hosts.deny and enter in: xapi:ALL – What this does is restrict every IP from accessing the XAPI. Second, you’ll need to edit the hosts.allow file, which takes precedence over the hosts.deny and specify the ip adresses or range of ip addresses that you would like to allow access to the XAPI. The hosts.allow file is located /etc/hosts.allow
Allow access to a specific ip in the hosts.allow you would put in the following replacing IPADDRESS with the ip you would like to grant access:
xapi:IPADDRESS
Example:
xapi:24.22.12.222
To allow access to a group of ip addresses, for our example, lets use 24.22. – this would allow any ip address that begins with 24.22. to access the XAPI.
Example:
xapi: 24.22.
If you happen to come across this page, what do you do to lock down your XenServer installs? I’ll be writing a few more articles as I dive deeper into Xen and XenServer, so be sure to check back often.
This is the new server I am putting together, it will control do the following:
Security Server (Video Camera’s with motion detection / recording) – Going to run ZoneMinder
Media / File Server – 1TB of storage w/rsync of important files to backup offsite.
Home Automation Server – Lighting / Temp control
Web Server – light duty / intranet
DB Server – very light / dev work
Backup Server – backup for some production sites
Vmware Server – Running 2 VM’s – Light duty (Win XP and a Linux Distro)
Dev Server – For testing some apps
Sounds like a lot, but its all light duty and this server should be plenty for it. And with the HD choice and the energy efficent options with the Core 2 I should be able keep the energy consumption down.
The server will be running Debian GNU/Linux of course.
PSU: CORSAIR CMPSU-620HX
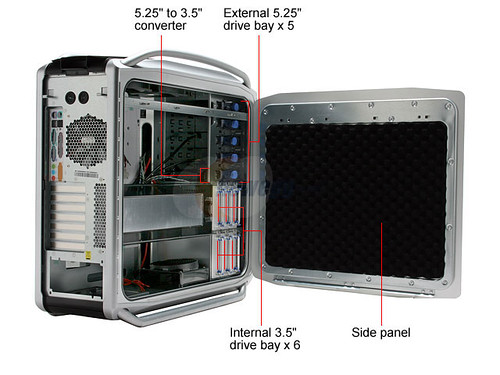
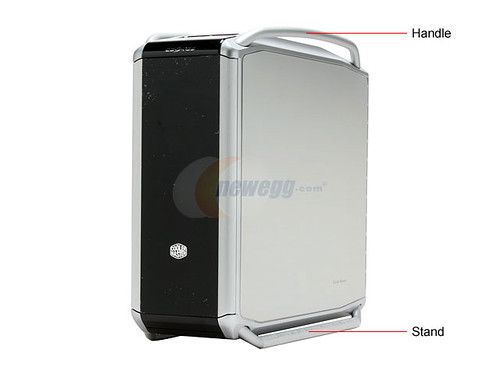
Case: COOLER MASTER COSMOS 1000
Motherboard: ASUS P5K-V LGA 775 Intel G33 ATX Intel Motherboard – Retail
CPU: Intel Core 2 Duo E6750 Conroe 2.66GHz
Memory: G.SKILL 4GB(2 x 2GB)
HD: Western Digital Caviar GP WD10EACS 1TB 5400 to 7200 RPM 16MB Cache SATA 3.0Gb/s
Once the stuff starts rolling in, I’ll take some shots. I did receive the case last night, this thing weighs a ton, but it looks pretty solid. It should really keep the noise down and be near silent.